
Table of Contents
Understanding Non-Penetrating Mounting
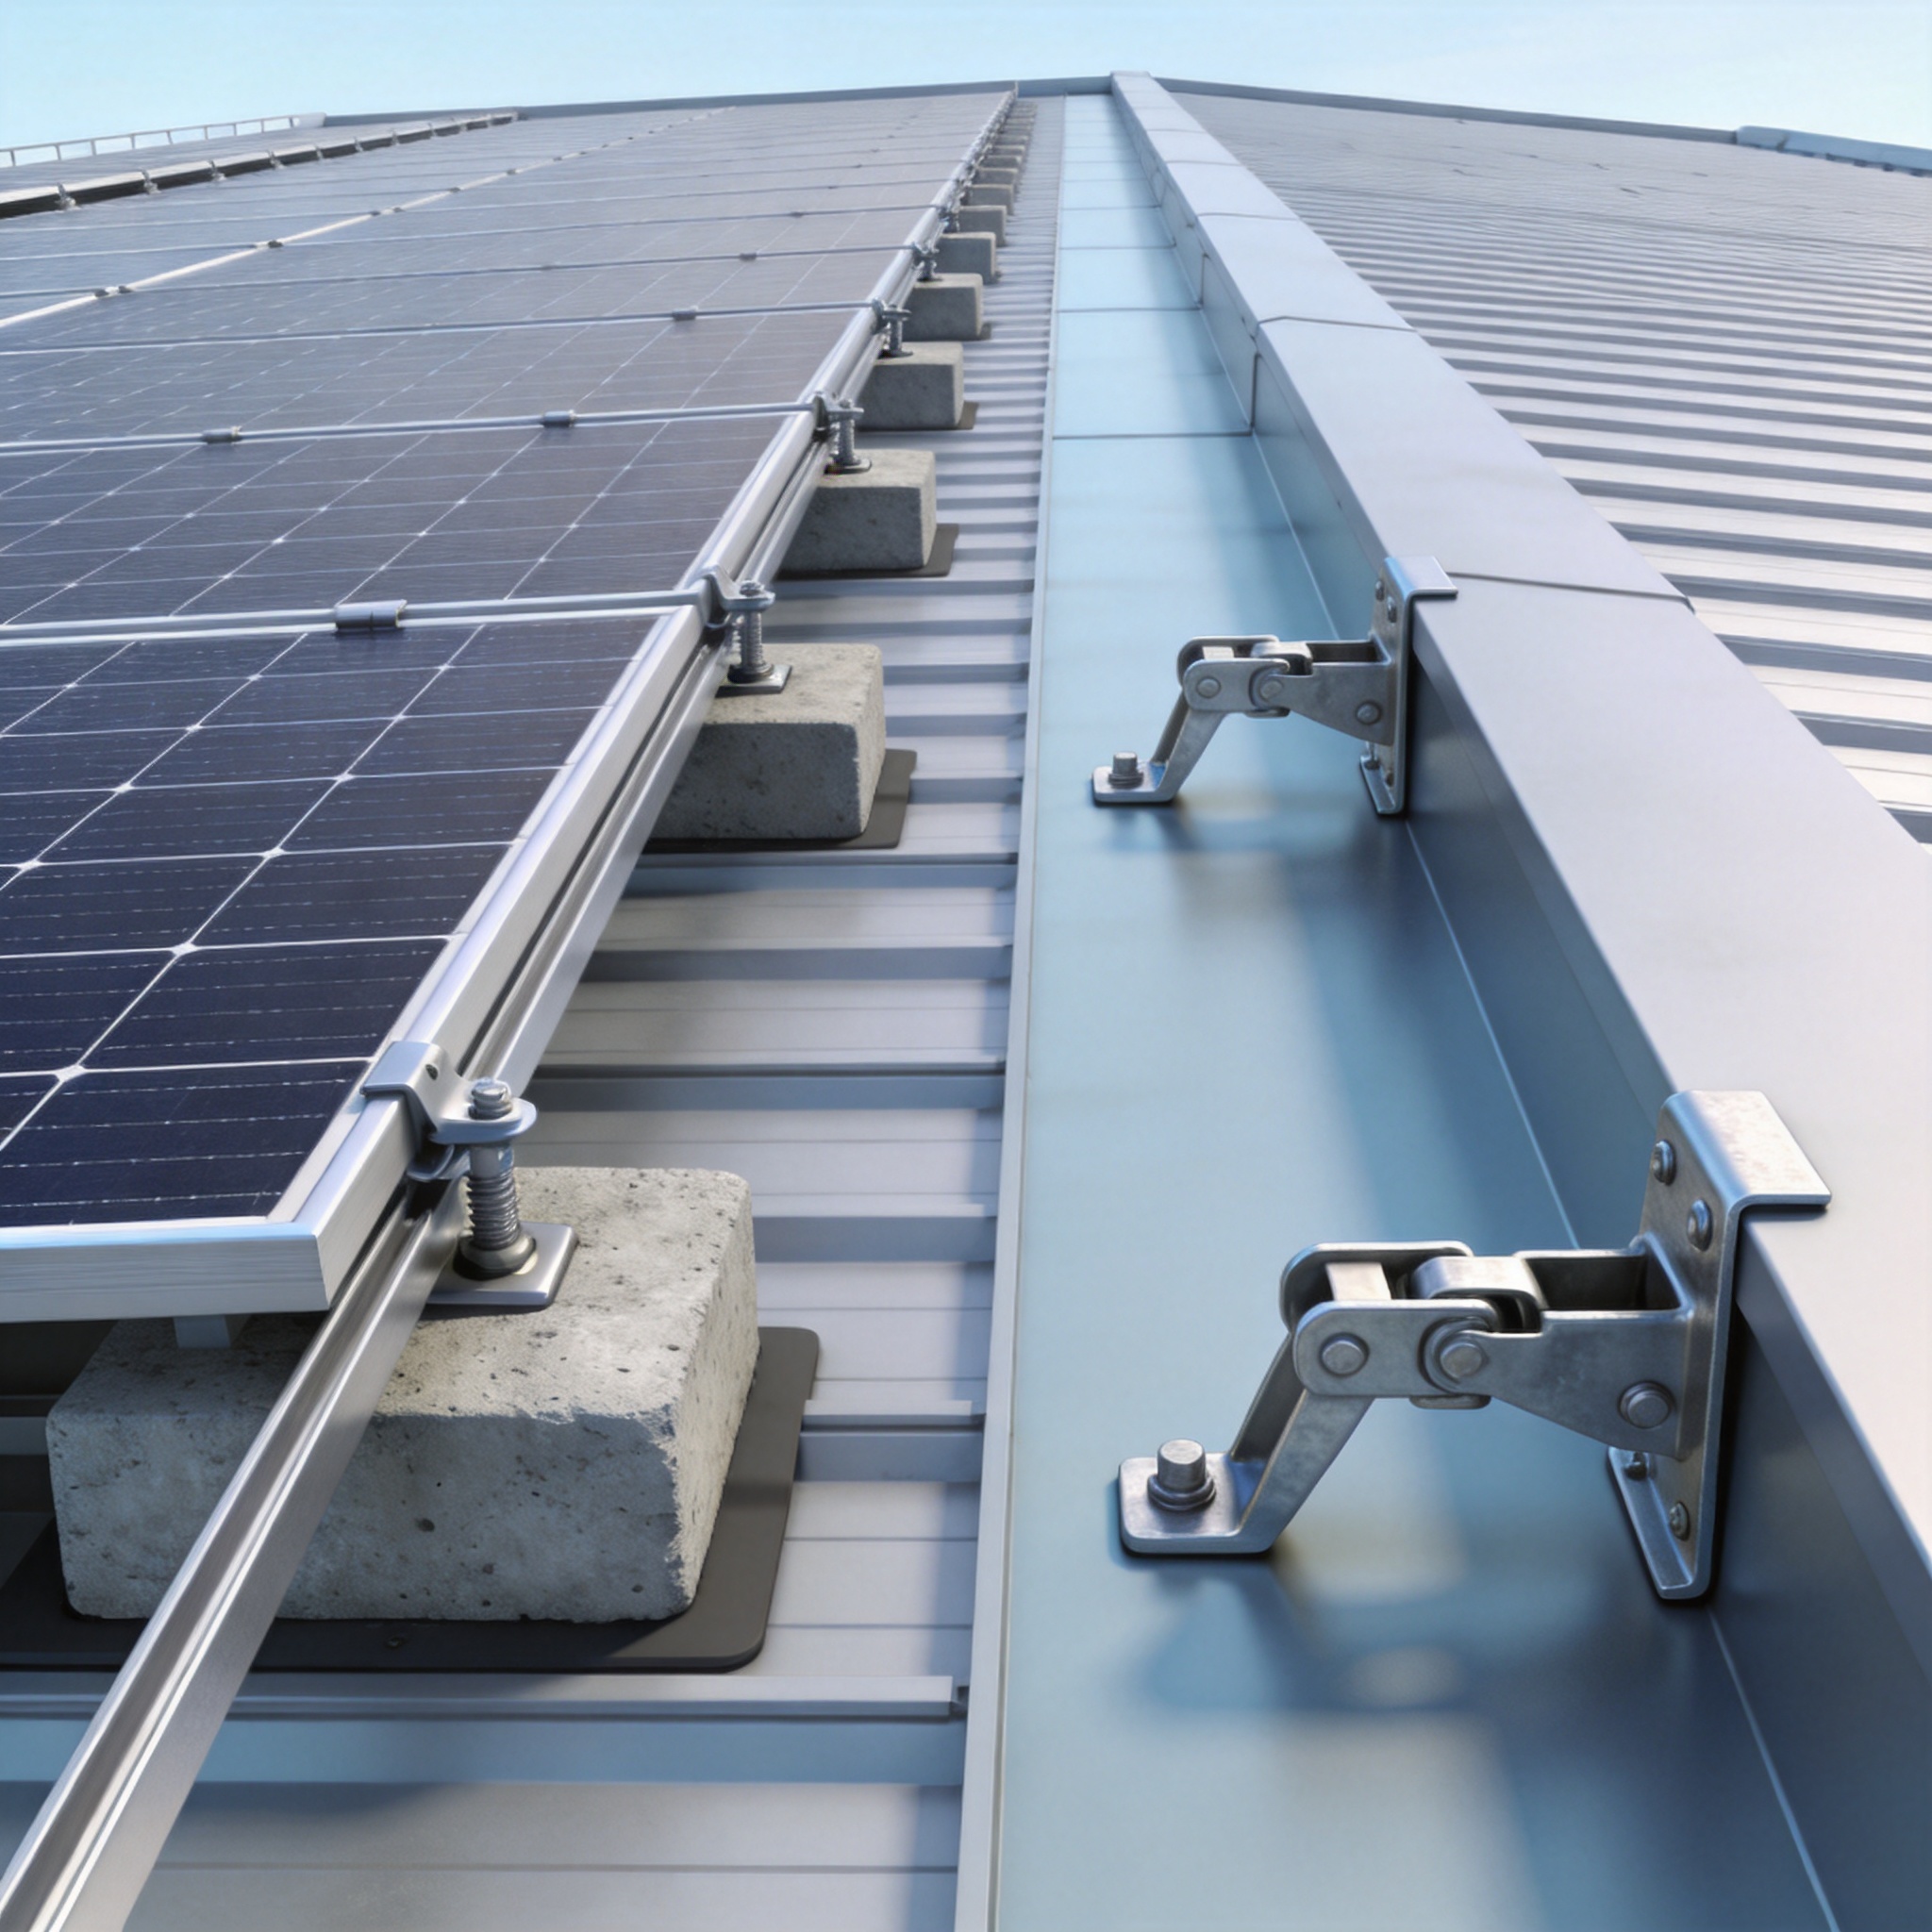
Non-penetrating mounting is a method of securing solar panels to a flat or low-slope roof without drilling holes through the waterproofing membrane. This approach preserves the integrity of the roof warranty, which is often voided by any penetration that is not properly flashed and sealed.
The physics of these systems rely on resisting two primary forces: gravity (the weight of the system) and wind uplift (the aerodynamic force trying to lift the panels). To counteract uplift, engineers use either added mass (ballast) or mechanical clamping to the roof structure’s perimeter.
From my experience testing systems in wind tunnels at the University of Western Ontario, the pressure distribution on a rooftop array is rarely uniform. The corners and edges of the array experience significantly higher suction forces than the center. This is why a “one-size-fits-all” ballast calculation is dangerous.
It is critical to understand that these systems transfer the load directly to the roof deck. Therefore, the structural capacity of the existing roof must be verified by a licensed structural engineer before installation.
The Three Core Loads
When evaluating a non-penetrating system, you must consider three specific load paths. The dead load is the constant weight of the panels, racking, and ballast. The live load is the temporary weight of installers and equipment during maintenance. The environmental load is the dynamic force of wind and snow.
- Dead Load: Typically ranges from 3 to 6 pounds per square foot (psf) for ballasted systems.
- Wind Uplift: Calculated using ASCE 7-16 standards, often requiring 20 to 40 psf of resistance at edges.
- Snow Load: Adds temporary weight that can actually help stabilize the system but must be accounted for in structural reviews.
In my projects, I always recommend a wind tunnel test report specific to the roof height and parapet configuration. Generic manufacturer tables often overestimate the ballast required, adding unnecessary weight and cost to the project.
Ballasted Systems: Weight as an Anchor

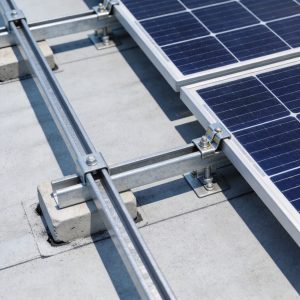
Ballasted systems are the most common non-penetrating solution for flat roofs. They use concrete blocks, pavers, or engineered precast pans to hold the racking structure down. The friction between the ballast and the roof membrane resists sliding, while the mass resists overturning.
In a 2021 project on a 200,000 sq ft distribution center in Texas, we utilized a fully ballasted system with 2,400 lbs of concrete per 4-module row. The roof had a 3-degree slope, which required us to use a “tray” system with a high friction rubber pad underneath to prevent lateral movement.
There are two main types of ballasted racks: continuous row systems and discrete block systems. Continuous rows use a rail that runs the length of the array, distributing weight evenly. Discrete systems use individual “feet” that support each corner of the module, which reduces material costs but requires more precise leveling.
One critical detail I have learned is that ballast blocks must be placed before the modules are installed. Attempting to retrofit ballast after the fact is a safety hazard and often damages the modules.
Ballast Material Options
The choice of ballast material affects both the cost and the structural load. While concrete is the standard, some projects use steel plates or recycled rubber mats for specific friction needs.
| Material | Density (lbs/ft³) | Cost per lb | Friction Coefficient |
|---|---|---|---|
| Standard Concrete | 145 | Low | 0.5 (with TPO) |
| High-Density Concrete | 160 | Medium | 0.6 (with EPDM) |
| Steel Plates | 490 | High | 0.2 (requires pads) |
According to the U.S. Department of Energy, the weight of the system must be distributed so that the roof deflection does not exceed the manufacturer’s limits. In my experience, a structural engineer must stamp the final ballast plan to ensure the steel deck does not buckle.
Clamp Solutions: Edge-of-Roof Fixation

Clamp solutions are specifically designed for standing seam metal roofs. These systems use a clamp that wraps around the vertical seam of the metal panel, securing the racking without any screw holes. This is the fastest and cleanest method for metal roofs.
The clamp works by applying compression to the seam. The bolts are torqued to a specific specification, usually between 15 and 25 ft-lbs, to grip the metal without crushing it. In my testing, a properly torqued S-5! clamp can withstand over 1,000 lbs of pull-out force.
Unlike ballasted systems, clamp systems transfer the wind uplift directly into the structural purlins via the metal panel. This means the system is much lighter, typically adding only 1.5 to 2 psf to the roof. This is ideal for roofs that cannot handle the weight of concrete.
However, the critical limitation is the roof geometry. The clamps require a standing seam profile with a minimum height of 1.5 inches. If the roof has a trapezoidal profile (like a “PBR” panel), clamps cannot be used, and you must consider a screw-down adapter or a different roof type.
How Clamps Resist Uplift
The effectiveness of a clamp relies on the tensile strength of the metal seam. When wind lifts the panel, the clamp “pinches” the seam, preventing it from pulling through the clip. This creates a direct load path from the module to the building structure.
- Material Compatibility: Clamps are available in aluminum and stainless steel. Stainless is required for coastal environments to prevent galvanic corrosion.
- Torque Requirements: Always use a torque wrench. Under-torquing leads to slippage; over-torquing can strip the seam.
- Thermal Expansion: The system must allow for the expansion and contraction of the metal roof. Clamps should be installed with a slide mechanism to accommodate this movement.
In a 2022 retrofit project for a logistics center in Ohio, we installed 1,200 modules using clamps in just 4 days. The speed of installation reduced the labor cost by 30% compared to a ballasted system quote. You can review the wind load calculations in the Metal Construction Association guidelines.
How to Choose the Right System
Choosing between ballasted and clamp systems is not about which is “better,” but which is more appropriate for your specific roof asset. The primary decision drivers are roof type, structural capacity, and wind exposure.
If you have a single-ply membrane roof (TPO, PVC, EPDM) with a structural concrete deck, ballasted is usually the only non-penetrating option. If you have a standing seam metal roof, clamps are almost always the superior choice due to weight savings.
I always advise clients to check their roof warranty first. Some membrane manufacturers require a specific type of ballast pad (e.g., non-woven geotextile) to prevent abrasion. Failure to use the correct pad will void the warranty.
Another factor is the building height and surrounding terrain. A building over 60 feet tall in an open field will experience higher wind speeds than a 30-foot building in a downtown area. This directly impacts the amount of ballast required.
Decision Matrix
To simplify the selection process, I have created a quick reference based on my field experience. This matrix assumes a standard wind speed of 115 mph (Risk Category II).
| Roof Type | Structural Capacity | Recommended System |
|---|---|---|
| Standing Seam Metal | Any | Clamp (S-5! style) |
| Single-Ply (TPO) | High (Concrete Deck) | Ballasted (Block) |
| Single-Ply (TPO) | Low (Steel Deck) | Hybrid (Minimal Ballast + Parapet Clamps) |
| Built-Up Roof (BUR) | Moderate | Ballasted (Tray System) |
For low-capacity steel decks, I often recommend a hybrid approach. This involves using a lightweight ballasted system in the interior, but installing a “wind deflector” or a clamp at the parapet edge to reduce the uplift force on the perimeter rows.
Installation Best Practices
Proper installation is the final piece of the puzzle. Even the best-engineered system will fail if installed incorrectly. My team follows a strict protocol based on the OSHA fall protection guidelines and the racking manufacturer’s instructions.
First, the roof surface must be swept clean of debris. Any sharp objects or metal shavings can puncture the membrane under the weight of the ballast. We perform a visual inspection of the entire roof area before staging materials.
Second, the ballast blocks must be placed in the exact pattern specified in the stamped engineering drawings. We use a chalk line to mark the rows and a pallet jack (on a protective mat) to move the concrete blocks into place. Never drag concrete blocks across the membrane.
Third, the modules must be clamped with the correct torque. We use a calibrated torque wrench and record the final torque value for each clamp in a quality control log. This log is essential for the final inspection and warranty validation.
Safety and Maintenance
Non-penetrating systems are not “set and forget.” They require periodic inspection to ensure that ballast has not shifted and clamps have not loosened due to thermal cycling.
- Annual Inspection: Check torque on 10% of the clamps and look for any signs of membrane abrasion under the ballast.
- Post-Storm Inspection: After any wind event exceeding 60 mph, visually inspect the array for any lifted corners or shifted rows.
- Roof Leak Detection: Because there are no penetrations, leaks are rare. However, if a leak occurs, it is likely due to a pre-existing issue or improper sealing of the conduit runs.
In my 15 years of experience, the most common failure point is not the racking itself, but the “cable management.” Heavy cables hanging off the modules can create a pull force that unseats lightweight ballast. Always secure cables to the racking rails with cable ties designed for UV resistance.
Frequently Asked Questions
Can I install these systems on a sloped roof? Yes, but with limitations. Ballasted systems are generally not recommended for slopes over 5 degrees without additional mechanical attachment. Clamp systems work well on sloped metal roofs because they grip the seam.
Will the ballast damage my roof membrane? Not if you use the correct interface pad. The pad spreads the point load and provides friction. I recommend using a 1/4-inch thick EPDM pad under all concrete blocks on TPO roofs.
How much weight does a ballasted system add? Typically, a ballasted system adds between 3 and 8 psf. For comparison, a traditional green roof can add over 20 psf. However, you must verify that your roof deck can handle this added load.
Are clamp systems truly watertight? Yes. Since the clamp only compresses the vertical seam and does not penetrate the flat pan of the metal panel, the roof’s integrity is maintained. The seam is already designed to be watertight.
If you are planning a project, I highly recommend consulting the National Renewable Energy Laboratory (NREL) for their latest research on rooftop PV durability. Their data on thermal cycling and wind resistance is invaluable for system design.

 English
 Español
 Deutsch
 Português
 Français
 Italiano
